How To Replace A Garbage Disposal Splash Guard

Replacement Garbage Disposal Splash Guard And Drain Stopper Food Waster Disposer

Replacement Garbage Disposal Disposer Stopper Splash Guard Whirlaway Food Waster Disposer

Sinkmaster 550 Repair Manual

3 5 Garbage Disposal Flange And Stopper Kit Drain For Copper Kitchen Sink Garbage Disposer Power Kits
In Sink Erator Masterplumber Smg 00 Mounting Gasket For Garbage Disposal Quantity 6 Cvdfsgmgsddzf

How To Prevent A Plumbing Disaster With Your Garbage Disposal The Washington Post

You can jam your screwdriver into these flaps and turn the nut counter clockwise threading on by a fourth of a turn.
How to replace a garbage disposal splash guard - The hardest part of reinstallation is hoisting the disposer up and into place with one hand while you try to engage the locking ring with the other. Replace the splash guard. This is the easy part. Then remove the drainpipe and disconnect the quick connect fitting photo 1.
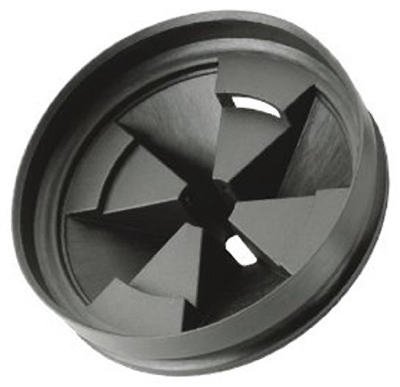
Push it in a clockwise direction about 1 4 of a turn. The splash guard fits snugly on top of the disposal like a plastic lid on a can of peanuts. All you have to do for this step is remove the old splash guard wipe off the top of the disposal and affix the new splash guard. Replace the splash guard once the disposal has been removed you can proceed to replace the splash guard.
The garbage disposal will unlock and fall off of its sink mount. This is the tricky part. Replace the old splash guard with a new one photo 2. Now is the big moment.
Required tools for. Take note that your garbage disposal unit is connected to the sink with a metal nut which has dog ear flaps that your screwdriver will fit into. Just peel the old one off wipe the top of the disposal clean and snap the new one on. Holding the heavy disposal in place while you tighten the locking.
The new splash guard should fit tightly over the disposal much like a lid to a food storage container. Replace the splash guard. Step 5 make sure the garbage disposal is clean on.

Top 8 Most Popular Ce Certificated Food Waste Disposer Brands And Get Free Shipping 59bb3in7

Top 8 Most Popular Ce Certificated Food Waste Disposer Brands And Get Free Shipping 59bb3in7

Emerson E10 Garbage Disposal Manual

Top 8 Most Popular Ce Certificated Food Waste Disposer Brands And Get Free Shipping 59bb3in7

Best Top Disposal Food Waste Ideas And Get Free Shipping Nlma2926a

Best Top Disposal Food Waste Ideas And Get Free Shipping Nlma2926a
13 Best Garbage Disposals Under 100 In 2020 Buyer S Guide Homesthetics Inspiring Ideas For Your Home
Best Companies For Wast Disposal In China Brands And Get Free Shipping J7a89e4e

Larsen Supply Whirl A Way Stopper 39 9069 Best Buy Deeiboiop2587

Hydromaid Water Powered Waste Garbage Disposer Garbage Disposer Power Kits

Dmh Single Outlet Garbage Disposal Air Switch Button Fits Insinkerator Waste King Stainless Steel Food Waster Disposer

Insinkerator Evolution Pro Compact 3 4 Hp Garbage Disposer Kellybzmh

Titan Us Tn T 1060 T 1060 Garbage Disposal 1 1 4 Hp Premium Black 70447 Clearyl

Ge Gfc535v 5 Horsepower Deluxe Continuous Feed Disposal Food Waste Disposer With Power Cord Attached Garbage Disposer Power Kits

